
[4] 글쓰기 구현하기 및 게시판 글 보여주기
들어가며
이번 포스팅에서는 로그인한 사용자가 있을 때 글쓰기를 작성하여 글을 작성하기능을 구현하고, 작성된 글을 모두 보여주는 것을 구현할 예정입니다.
(이전 포스팅에서 MemberServiceImpl을 통해 만들어 봤기 때문에 이번 포스팅부터는 따로 생성하지는 않겠다.
이게시판 만들기에서는 Jqery, JavaScript 를 활용하여 부가적인 기능을 구현할 예정입니다.)
준비
[SpringBoot] 무작정 (REST API)CRUD게시판을 만들어 보자 게시판 엔티티 설계(연관관게 매핑)및 게시판
[3] 엔티티 설계(연관관계 매핑) 및 게시판 뷰 만들기 들어가며 이전 포스팅 까지는 로그인및 회원가입을 구현해봤다 이번 포스팅에서는 Board 엔티티를 만들고 Board 엔티티와 Member 엔티티간 연관
back-stead.tistory.com
Repository
BoardRepository
@Repository
public interface BoardRepository extends JpaRepository<Board, Long> {
}
스프링 데이터 JPA를 활용해서 Repository작성
(기본적인 crud 제공)
Service
BoardServiceImpl
@Service
@Transactional
@RequiredArgsConstructor
public class BoardServiceImpl implements BoardService {

    private final BoardRepository boardRepository;
    private final MemberService memberService;


    @Override
    public Board save(BoardDto boardDto) {

        String username = boardDto.getMemberDto().getUsername();
        Member byUsername = memberService.findByUsername(username);
        Board build = Board.builder()
                .title(boardDto.getTitle())
                .dateTime(LocalDateTime.now())
                .writer(byUsername.getUsername())
                .password(boardDto.getPassword())
                .content(boardDto.getContent())
                .count(0)
                .member(byUsername)
                .views(0)
                .build();

        Board save = boardRepository.save(build);
        return save;
    }

    @Override
    public List<Board> findAll() {
        return boardRepository.findAll();
    }
}BoardService를 인터페이스로 만들고 구현한 BoardServiceImpl을 생성한다.
- save(BoardDto boardDto) : dto를 통해서 값을 전달하고 builder을 통해서 실제 객체인 Board에 저장한다.
- .writer(...) : 로그인한 사용자의 정보 username을 가져와 작성자로 적는다.
- .count(0), .views(0) : 아직 구현은 하지 않았지만. 기본값을 0으로 저장한다.
- findAll() : 저장된 모든 값을 가져온다.
Controller
BoardController
@GetMapping("/board")
public String board(Model model,HttpSession session){
	...
	List<Board> boardAll = boardService.findAll();
	model.addAttribute("boardAll",boardAll);

	return "board/board";
}

@GetMapping("/boardWrit")
public String write(Model model, HttpSession session){

	getSession(model, session);
	model.addAttribute("board",new BoardDto());
	return "board/wirteboard";
}

@PostMapping("/boardWrit")
@ResponseBody
public ResponseEntity<?> writing(@Valid @RequestBody BoardDto boardDto, BindingResult result){
	try {
		if (result.hasErrors()){
 			Map<String,String> errorMessage = new HashMap<>();
			for (FieldError fieldError : result.getFieldErrors()) {
			errorMessage.put(fieldError.getField(), fieldError.getDefaultMessage());
			}
			return ResponseEntity.status(HttpStatus.BAD_REQUEST).body(errorMessage);
		}
		boardService.save(boardDto);

		return ResponseEntity.ok("성공");

	}catch (Exception e){
		e.printStackTrace();
		return ResponseEntity.status(HttpStatus.INTERNAL_SERVER_ERROR).body("오류발생");
	}
}- board() : board의 모든 값을 List<>로 받아와서 뷰에 전달해 준다.
- wirte() : BoardDto를 뷰에 전달해 준다.
- writing() : RESTFUL API 형태로 작성,
- @Valid 검증을 통해서 오류가 발생 시에 Map<> 타입인 errorMessage에 담아서 전달,
- 오류가 없다면 저장 후 성공메시지 전달.
- 예외 발생 시에는 500 에러를 날리며, "오류발생"이라고 전송

성공 시에는 200 상태코드를 보내며 성공이라는 값을 받을 수 있다.
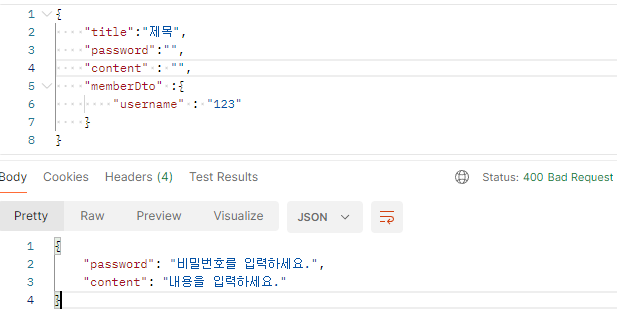
비밀번호와 내용값을 보내지 않았다면 dto에 작성한 오류메시지가 JOSN형태로 매핑돼서 값을 보내며
우리가 작성한 상태코드 400 에러를 발생한다.
위 사진처럼 실행했을 때 똑같은 값이 나왔다면 성공인 것이다. 실패했다면. 해결오류 메시지를 보고 스스로 해결해봐야 한다. 저도... 개발하면서 일명 삽질을 하면서 실력이 느는 것 같다.
HTML
일단 DB에 저장된 모든 값을 뷰에 뿌리는 것부터 해볼 것이다.
board.html
<tbody th:each="boards : ${boardAll}">
    <tr >
        <th scope="row">
            <a th:text="${boards.id}">1</a>
        </th>
        <td>
            <span th:text="${boards.title}">제목</span>
        </td>
        <td th:text="${boards.writer}">작성자</td>
        <td th:text="${#temporals.format(boards.dateTime, 'yyyy-MM-dd')}">오늘작성</td>
        <td th:text="${boards.views}">100</td>
    </tr>
</tbody><tbody> 부분을 위 코드로 수정해 주자. th:each를 통해서 반복일 실행한다. java의 for(a:b)라고 생각하면 될 것입니다.
코드에서 보면 작성 날짜형식은 "년 월 일"만 표시하고 싶어서 변경했다.
이제 게시판을 작성하는 뷰를 만들어보자.
writeboard.html
<!DOCTYPE html>
<html xmlns:th="http://www.thymeleaf.org">
<head th:replace="fragments/header :: header"></head>

<script src="https://code.jquery.com/jquery-3.6.0.min.js"></script>
<script th:inline="javascript">

  function writeboard(){
    const title = document.getElementById('title_input').value;
    const loginMember_username = document.getElementById('writer_input').value;
    const password = document.getElementById('password_input').value;
    const content = document.getElementById('content_input').value;

    var boardDto={
      "title" :title,
      "password" : password,
      "content": content,
      "memberDto" :{
        "username" :loginMember_username
      }
    }

    $.ajax({
      url :"boardWrit",
      method : "post",
      contentType : "application/json",
      data: JSON.stringify(boardDto),
      success :function (response){
        window.location.href="/board"
      },
      error : function (xhr){
        if (xhr.status ===500){
          alert("서버 오류");
        }
        if (xhr.status ===400){
          var errorMap = JSON.parse(xhr.responseText);
         $.each(errorMap, function (key, value){
           if(key==="title"){
             alert(value);
           }else if(key==="password"){
             alert(value);
           }else if(key==="content"){
             alert(value);
           }
         })
        }
      }
    });

  }
  function cancle(){
    window.location.href="/board";
  }
</script>
<body>

  <div class="container mt-5"th:object="${board}">
    <div class="block table-responsive grid-view">
        <table class="table table-bordered">
          <caption class="hidden">코드폭탄</caption>
          <tbody>
          <tr>
            <th><label th:for="writer">작성자</label></th>
            <td>
              <input class="form-control" id="writer_input" type="text" th:value="${loginMember.username}" readonly></td>
          </tr>
          <tr>
            <th><label th:for="title">제목</label></th>
            <td colspan="3"><input class="form-control" id="title_input" type="text" th:field="*{title}"></td>
          </tr>
          <tr>
            <th><label th:for="password">비밀번호</label></th>
            <td colspan="3"><input class="form-control" id="password_input" type="password" th:field="*{password}"></td>
          </tr>
          <tr>
            <th><label th:for="content">내용</label></th>
            <td colspan="3">
              <textarea class="form-control" th:field="*{content}"  id="content_input" rows="5" cols="80" style="height: 235px; width: 614px;"></textarea>
            </td>
          </tr>
          </tbody>
        </table>
      <button onclick="writeboard()">글쓰기</button>
      <button onclick="cancle()">취소</button>
    </div>
  </div>

</body>
</html>- writeboard() : 클릭 시에 실행되며, id값을 가져와 title, loginMember_username, password 등을 가져온다.
- boardDto() : 키-값 형식으로 값을 담는다.
- JSON.stringify() : 배열, 문자 등을 json형태로 변환한다.
- JSON.parse() : josn형식을 js타입으로 변환한다.
- cancel() : 클릭 시 /board로 이동한다.
실행
만약 값을 입력하지 않고 글쓰기 버튼을 클릭하면 alter창에 오류 메시지를 표기한다.
다음으로
오늘은 ajax통신을 통해서 글쓰기를 구현해 봤다 다음시간에는 게시글 번호를 클릭 시에 게시글의 정보를 볼수있는 폼으로 이동하고, 클릭시에 조회수를 1씩 증가하는 코드를 구현해 볼 예정이다.