
게시글에 댓글을 등록하는 기능을 구현해 보자!
들어가며
이전 포스팅까지는 댓글의 도메인을 설계해 봤습니다. 이번에는 게시글에서 다른 사용자가 커뮤니케이션을 하기 위한 댓글을 등록하는 기능을 구현해 보겠습니다.
(댓글 기능구현은 jquey를 통해서 구현했습니다.)
사전 준비
만약 게시판 프로젝트를 하시려는 분은
이전포스팅 따라 해 만들어주시기 바랍니다!
[SpringBoot] 무작정 (REST API)CRUD 게시판을 만들기 댓글 도메인 설계 [12-1]
댓글을 내용을 저장할 도메인을 설계해보자 들어가며 이번 포스팅에서는 댓글 기능을 구현하기 전에 간단하게 도메인부터 설계해보도록 하겠습니다. 사전 준비 만약 게시판 프로젝트를 하시려
back-stead.tistory.com
전체 코드는 깃에 올려두었습니다.
GitHub - CHISANW/message-board
Contribute to CHISANW/message-board development by creating an account on GitHub.
github.com
구현 내용
1. 게시글에 댓글을 작성하는 기능을 먼저 구현한다.
댓글창안에 작성자 아이디, 댓글내용, 작성한 시간등을 보여주며 버튼으로는 삭제 수정 버튼을 보이게 하는 것이 목적
Exception
이전에 만들었던 @ExceptionHandler을 사용하기 위해서 댓글 기능에서 오류게 발생했을 때 공통으로 댓글 예외를 처리하기 위해서 CommnetException 클래스를 만들어줍니다.
Repostory
CommentRepository
@Repository
public interface CommentRepository extends JpaRepository<Comment,Long> {

    Optional<Comment> findById(Long CommentId);

    @Query("select c from Comment c where c.board.Id = :boardId")
    List<Comment> findByBoard_Id(@Param("boardId") Long boardId);

    @Query("SELECT COUNT(c) from Comment c where c.board.Id=:id")
    Integer countComment(@Param("id") Long boardId);				// 댓글수의 총합을 조회
}- findById() : 댓글의 프라이머리키로 댓글을 조회
- findByBoard_Id() : jpql 쿼리를 사용해서 boardId키 값으로 댓글 조회
- countCommnet() : jpql쿼리를 사용해서 boardId로 댓글의 총 수를 조화
JPA의 다양한 기능을 사용하기 위해서 Spring data jpa와 JPQL을 사용해 봤습니다.
Service
CommentServiceImpl.class
@Service
@Transactional
@RequiredArgsConstructor
@Slf4j
public class CommentServiceImpl implements CommentService {

    private final CommentRepository commentRepository;
    private final BoardServiceImpl boardService;
    private final MemberService memberService;

    @Override
    public Comment save(CommentDto commentDto) {

        Long boardId = commentDto.getBoardDto().getId();
        String username = commentDto.getMemberDto().getUsername();
        Member byUsername = memberService.findByUsername(username);

        Board byBoardId = boardService.findByBoardId(boardId);

        if (byUsername==null){
            throw new Login_RestException();
        }

        Comment build = Comment.builder()
                .content(commentDto.getComment())
                .dateTime(LocalDateTime.now())
                .member(byUsername)
                .board(byBoardId).build();

        Comment save = commentRepository.save(build);
        setComment(byBoardId.getId());
        return save;
    }


    @Override    //댓글 모두 보여주기
    public List<Comment> findAllComment(Long boardId) {
        List<Comment> byBoardId = commentRepository.findByBoard_Id(boardId);
        return byBoardId;
    }

    @Override //댓글수 카운트
    public Integer countComment(Long boardId) {
        try{
            return commentRepository.countComment(boardId);
        }catch (Exception e){
            e.printStackTrace();
            throw new RuntimeException("값이 나오지 않았습니다.");
        }
    }

    private Board setComment(Long boardId){       // 총합 댓글 갯수 설정
        Integer countComment = countComment(boardId);
        Board byBoardId = boardService.findByBoardId(boardId);
        byBoardId.setCount(countComment);
        return boardService.entitySave(byBoardId);
    }


}- save(CommentDto commentDto) : 댓글을 저장하기 위한 로직 Comment 엔티티는 Board와 Memberd의 id값으로 연결되어 있기 때문에 Board와 Member의 값을 Comment에 저장해줘야 한다. 만약 로그인한 사용자가 없다면 로그인을 하지 않았다는 Login_RestException() 예외를 터트린다.
- findAllCommnet(Long boardId) : 게시글 상세로 들어왔을 때 현재 작성된 댓글을 모두 보여주기 위한 메서드
- countCommnet(Long board) : 게시글에 몇 개의 댓글이 작성되어 있는지 출력해 주는 메서드
이렇게 간단하게 댓글을 저장하는 로직을 구현했습니다.
Controller
CommnetController.class
@RestController
@Slf4j
@RequiredArgsConstructor
public class CommentController {

    private final CommentServiceImpl commentService;

    @PostMapping("/board/comment")
    public ResponseEntity<?> comment(@RequestBody CommentDto commentDto){
        try{
            Comment saveComment = commentService.save(commentDto);
            return ResponseEntity.ok(saveComment);
        }catch (Login_RestException e) {
           throw new Login_RestException("로그인을 하지 않았습니다.");
        }catch (NotFindPageException e){
            throw new NotFindPage_RestException("게시글이 존재하지 않습니다.");
        }
    }

}
컨트롤러가 담당하는 업무가 많지 않도록 최대한 분리해 가면서 작성해 줬다.
그리고 BoardController의 @GetMapping("/board/{boardId}") 이 매핑 부분의 CommentService를 생성자 주입해 주고 다음과 같은 코드를 추가해줘야 한다 그래야 모든 댓글을 뿌려줄 수 있다.
 //추가
 List<Comment> allComment = commentService.findAllComment(boardId);  //조회수 값조회

 model.addAttribute("allComment", allComment);
model.addAttribute("comment", new CommentDto());VIEW
이제는 뷰를 만들어볼 차례입니다.
댓글이 보이는 뷰는 boardInfo.html의 내부이기 때문에 몇 가지 코드를 추가해줘야 합니다.
boardInfo.html (코드추가)
<!-- 게시글 상세 내용 아래 부분에 추가 -->

<!-- 댓글 목록 표시 -->
      <table class="table">
        <thead>
        <tr>
          <th>댓글창</th>
        </tr>
        </thead>
        <tbody th:each="comment: ${allComment}">
        <tr>
          <td>
            <input type="hidden" th:value="${comment.id}" id="comment_id">
            <div th:text="${comment.member.username}" style="font-weight: bold;color: #0D0D0D"></div>
            <div id ="comment_content"th:text="${comment.content}"/>
            <div th:text="${#temporals.format(comment.dateTime, 'yyyy-MM-dd HH:mm:ss')}" style="font-size: 10px"/>
            <button t style="font-size: 8px">
              <svg xmlns="http://www.w3.org/2000/svg" width="16" height="16" fill="currentColor" class="bi bi-x-circle" viewBox="0 0 16 16">
                <path d="M8 15A7 7 0 1 1 8 1a7 7 0 0 1 0 14zm0 1A8 8 0 1 0 8 0a8 8 0 0 0 0 16z"/>
                <path d="M4.646 4.646a.5.5 0 0 1 .708 0L8 7.293l2.646-2.647a.5.5 0 0 1 .708.708L8.707 8l2.647 2.646a.5.5 0 0 1-.708.708L8 8.707l-2.646 2.647a.5.5 0 0 1-.708-.708L7.293 8 4.646 5.354a.5.5 0 0 1 0-.708z"/>
              </svg></button>
            <button type="button"  style="padding: 0;">
              <img src="/img/CommnetModfiy.PNG" style="width: 20px; height: 20px;">
            </button>
          </td>
        </tr>
        </tbody>
      </table>

      <hr class="my-4"/>

      <div style="display: flex; flex-direction: column; align-items: center; text-align: center;">
        <textarea type="text" th:field="${comment.comment}"  id="comment_text" rows="5" cols="80" style="height: 235px; width: 614px;"></textarea>
        <br>
        <button onclick="boardComment()">댓글달기</button>
</div>아직 삭제기능 와 수정기능은 구현을 하지 않았지만 버튼만 구현해 놨습니다.. css와 html부분은 너무 어렵기 때문에..... 디자인적으로는 별로입니다...ㅜ
이제 게시글 메인 페이지에 한 게시글에 댓글이 몇 개다 달렸는지 표시하기 위에 board.html부분에 제목 <td></td> 부분을 다음과 같이 변경해 줍니다.
<td>
    <span th:text="${boards.title}"></span>
    <span th:if="${boards.count != 0}" th:text="'('+${boards.count}+')'" style="font-weight: bold">a</span>
</td>
이제 boardCommnet() 버튼을 jqeury로 구현해 보겠습니다.
function boardComment(){
    if (loginverfiy===true) {
      var id = document.getElementById('input_id').value;
      var comment = document.getElementById('comment_text').value;
      var login = document.getElementById('loginMember_username').value;

      var dto = {
        "comment": comment,
        "boardDto": {
          "id": id
        },
        "memberDto": {
          "username": login
        }
      };

      $.ajax({
        url: "/board/comment",
        method: "post",
        contentType: "application/json",
        data: JSON.stringify(dto),
        success: function (response) {
          location.reload();
        },
        error: function (xhr) {
          var errorMap = JSON.parse(xhr.responseText);
          $.each(errorMap, function (key,value){
            if (key==="message"){
              if(xhr.status===404){
                alert(value);
                window.location = "/board";
              }else if (xhr.status===500){
                alert("죄송합니다 오류가 발생했습니다.");
              }
            }
          });
        }
      });
    }else
      alert("로그인후 댓글을 작성할수 있습니다.");
}위에 정의해놓은 loginverify가 true일 때문 동작하도록 클라이언트단에 검증로직을 통해 로그인한 사용자만 작성할 수 있도록 해줍니다. 그리고 앞서 작성한 save() 메서드를 보면 등록된 사용자가 없으면 예외를 던지도록 서버에서도 검증을 처리해 줬습니다.
실행 및 확인
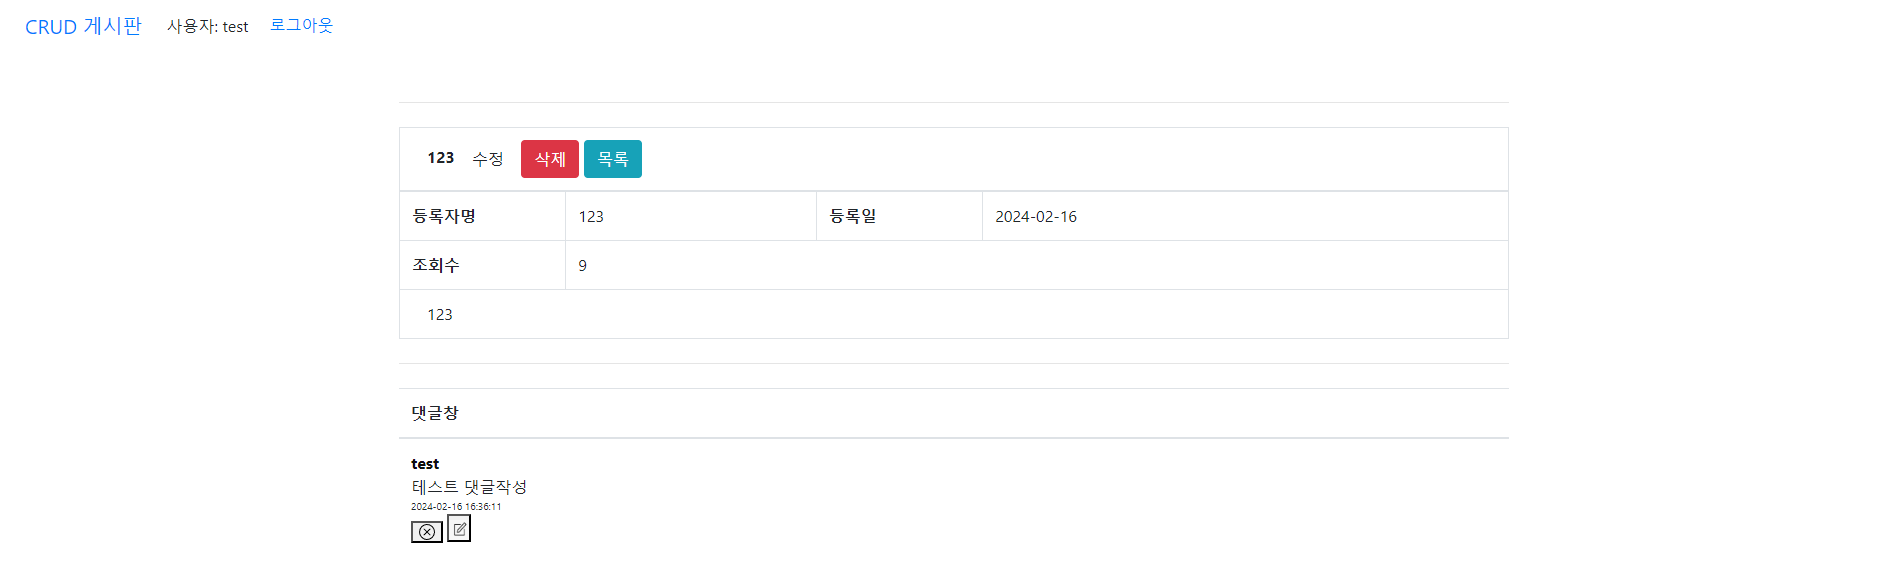
댓글 등록 성공 시

댓글 저장을 성공하게 되면 올바르게 댓글이 저장되는 것을 볼 수 있다.
댓글 등록 시 게시글 없을 때
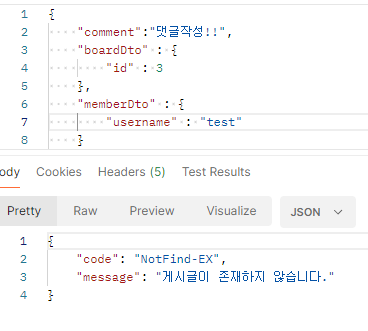
게시글이 없을 시 댓글을 등록했을 때는 위와 같이 오류메시지를 보내며 /board페이지로 이동할 것입니다.
댓글 등록 시 로그인하지 않았을 때
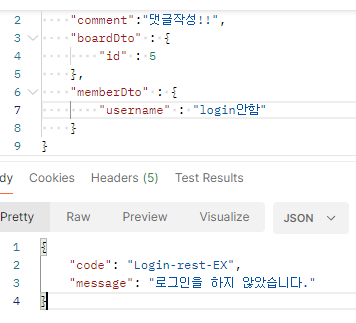
로그인을 하지 않고 댓글을 등록했을 때는 위와 같이 오류코드와 메시지가 나오는 것을 볼 수 있다.
게시글 메인페이지

제목 옆에 댓글수가 표시되는 것을 볼 수 있다.
전체 실행영상입니다.
다음으로
이번 포스팅까지는 댓글 폼을 만들고 댓글을 작성하는 기능을 구현해 봤습니다. 다음 포시팅에서는 수정 기능을 구현해 보도록 하겠습니다. 잘못된 부분이 있다면 댓글 달아주시면 감사하겠습니다.